Tuesday, 27 November 2012

I Love Cars

 SO... Hey again.


I'm a Huge Disney Pixar fan and i decided that i'm going to model Luigi !


This is where i am at the moment.

I know at the moment i need to work on the topology of the mouth and obviously get the tires in, but i'm enjoying this self given task so much i hope to have an end product that looks much much more like the model of luigi in disney pixar cars!

Im also modelling Luigi kind of high poly for personal satisfaction as i enjoy making things look pretty!. 


This is luigi so far still not unwrapped -.- and his beret isn't attached to the model for colour purposes 

Thanks for looking at my random model of the week, shall be doing more though!

Michelle.x

Monday, 26 November 2012

Rubbish box


                                 Hello Again!


The task that i was given this time was to create a photo-realistic rubbish box that will be used in a 3rd person game, and it's not just any photo realistic rubbish box it's one that was issued to me as a brief by the leamington spa Games developers Blitz games.

In this task i had to create a photo realistic box which contained a rubbish bag  (rubbish box). 

The constraints in this task were to have the box and all the included geometry in, at 500 tris or close; But not over.
Also i had a constraint of 1: 1025x1025 diffuse texture map; meaning that no other maps could be used on this particular project. eg normal maps/opacity maps.....


So for photorealistic you obviously need photo's of your reference imagery, the college shop people kindly lent some of the empty boxes, bits and bobs so pictures were taken especially for reference imagery and also to be used on my diffuse texture map.


So here is my totals, leaving me with 28 spare triangles on my trash box and contents.


Although i am in my budget it would have been nicer to have taken advantage of those last 28 triangles, but i just couldn't find a place for them to fit as i was happy with my results.


As i unwrapped my geometry it looked like this. why ? well i find things easier to unwrap and texture when they all have their own individual space/ place in 3dsmax.


When i was unwrapping i took everything out of the checked box so that when it comes to scaling them and placing them nicely in the box i  wouldn't have individually select every face that was overlapping other faces again.


Thus making the process a little less time consuming.


This UVW texture Unwrap map is my template for my final texture, this is how i know where the edges on my geometry are so i can match them up (almost) seamlessly for my end render.


My Texture map complete with the Brands modified so that if needs be the box can be used. ( even though there a probably more things i would have to consider before using the box in a game)


These are my final box renders. ( used a skylight for light shadowing)


Thanks for taking the time to look at my post.

Friday, 23 November 2012

Opacity maps on plants.

This is my task and i’m going to share it with you

TASK: to model a piece of foliage in under 800 tris (triangles), unwrap and texture it. Then make a symmetrical lower poly piece of foliage in under 30 tris, unwrap and texture if needs be.

SO i chose a piece of foliage that would probably fit in the the game The Sims 3.
I painted a Crassula plant as i think that they’re lovely to look at but not a flower.


This is to be copied and pasted loads to make the Crassula main cluster which will bulk up the main part of the plant.
 

I used the colours from this image i found on the internet so that i could get a slightly more accurate piece of foliage 
 
This is what my cluster looks like after copying and pasting the 1 used crassula leaves cluster.

I have to open 3dsmax to do the next part!
first i created a plane with 2 segments vertically and 2 segments horizontally leaving me with a plane that has 9 editable faces. I then turned it into an editable pole so that i could modify the vertices on the plane and make the cluster of leaves look believable.

I then opened my material editor by pressing the M key and using the ‘compact material editor’ i selected to use a diffuse map and  then find my cluster image and place it on the plane. This turned the plane grey so i then clicked on the checkerboard button with a little yellow dot on it to see my texture on my plane.
( this is the ‘’ show standard map in viewport’’ button)


In my view port i got this !!!! and this isnt what happens in games this isn't what the foliage looks like finished!
 

So i used an alpha map! This image represents my cluster of crassula leaves which white= visible in 3ds max and black = invisible!

now to do this is you must Go to Parent in your material editor


This is what my material editor looked like after going to the parent. You now need to select the sub heading under the name of Maps.

after you click on if you see a variety of different maps look for  Opacity  which is under the subheading maps. you then go to the end of this section to find the button None which then opens the same way your Diffuse maps do.  Find your black and white opacity map Jpeg or psd file and add it to the material editor.
you must travel back up to the parent again by pressing the circle checkerboard with an upward pointing arrow on it.


You will find that this is what your material editor looks like after.

Click ‘’ show standard map in viewport’’  and drag it onto the plane to see your final piece.This is what it should look like. 


So using my newly gained Opacity maps Knowledge i started my crassula foliage.


I ended up using just 681 tris for this as my singular stalks were over a hundred tris a pop. had i added anymore of them i would have had tris over 800 thus not sticking to my budget


so to make my symmetrical which was under 30 tris was easy i only used up 4 i rendered my foliage that was 681 tris and made an opacity map for that. made a plane and made my identical foliage.
This is my high poly and low poly crassula foliage image

Thanks again :D

So this is the program i am using !


Hello.


Basically the way this post is going to work is.. less words more pictures !

I am literally just going to go through the basics of the programme at college called 3D Studio Max !
Autodesk also offer a range of other modelling softwares, such as Maya Mudbox
123D..etc.


This is the programme i had  a brief understanding of in my previous course but will definitely learn a whole load of new things while doing this course! 


So lets get stuck into the Loading screen and the basics of my new software :D


So to start the programme i go to my 3d Studio Max Software icon on my desktop because that is where i created my short cut, otherwise you can go to the windows icon and find through search bar. if you're on a mac you can use spotlight or finder.


I feel that this software has quite a scary interface and i'm going to try and go over the Absolute basics of the 3d modelling software!

This is your load! click continue


THIS is a view port and if you see here the white writing is just the preferences on what you would like to see and not see when making your 3d model

if you lick on the smooth + highlights tab you'll find all the options
  i add Edged faces so that i can keep and eye on what my model looks like without having to guess. this is preferred by many if not all who use the programme.


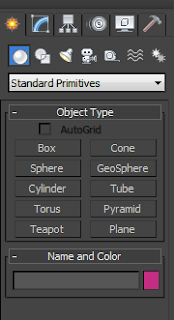
This part of the software is for all you basic starting and modifying of shapes. ( which will later become 3d models)


 THIS IS THE CREATE TAB ( if you hover over it it even says create)
 THIS IS THE MODIFY TAB ( says modify when hovered over)

(modify allows you to play with edges faces and vertices on your selected geometry)
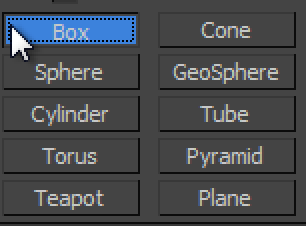
so under the create tab there is a sphere that in this image is highlighted blue.

this is where you can find all your geometry.


I clicked box for purposes of being quick on this topic 


Click and drag your mouse inside the view port untill there is a flat square and then pull the face up and away from the ''floor'' to create your geometry! to de-select the box making tool you have to right click. ( right click can also delete a piece of geometry that you accidentally placed and haven't finished creating)

Also to pan around your object in your selected view port click 'alt' and click down on the scrolling wheel of you mouse ''middle mouse button''
so now you just have a box in your screen! if you just right click on the box some options will come up 


You want           Shortcut key
Move                           W
Rotate                          E
Scale                           R


                            MOVE

ROTATE

SCALE


THIS IS THE TASK BAR OF WHICH IS AT THE TOP OF THE SCREEN!

here are some of the more important icons and what they do.
icon on the left is select only middle is select by name as if you name your geometry it is easier in the long run and the icon on the right is just a selection and it selects all the faces/verts/edges that it sees 


 The icon on the left is the move tool, in the middle is the rotate tool and on the right is the scale tool, ( if the scale tool doesnt have these 2 arrows on it may not scale in proportion, if it doesn't scale in proportion click on the icon and drop down to the one that looks like this!.

 This is angle snaps and this is particularly useful as you rotate in 0.5 degree sums and not 0.01degree sums. Thus making it quicker and easier to get an accurate 180 degree rotation
 this is for rendering you piece to see what it looks like without all its ugly faces. the one on the far left is the material editor but we don't need to worry about that today
the one on the left is the render setup icon and this is for fancying up your renders. the middle on is render frame window and this renders what is currently in the viewport  and i dont use too much at the moment but the one on the right is the render production tool and it takes the perspective of either the camera or the view of which you look at the object in the view port. ( also is affected by the render setup)

And that's all really for now! 

I really enjoy using 3d studio max and hope that these pictures can guide people into the software and not scare them away from max's crazy interface !

 But do not fear as Max is easy to get used to if you use it again and again!


Thanks again. :)