Hello.
Basically the way this post is going to work is.. less words more pictures !
I am literally just going to go through the basics of the programme at college called 3D Studio Max !
Autodesk also offer a range of other modelling softwares, such as Maya Mudbox
123D..etc.
This is the programme i had a brief understanding of in my previous course but will definitely learn a whole load of new things while doing this course!
So lets get stuck into the Loading screen and the basics of my new software :D
So to start the programme i go to my 3d Studio Max Software icon on my desktop because that is where i created my short cut, otherwise you can go to the windows icon and find through search bar. if you're on a mac you can use spotlight or finder.
I feel that this software has quite a scary interface and i'm going to try and go over the Absolute basics of the 3d modelling software!
This is your load! click continue
THIS is a view port and if you see here the white writing is just the preferences on what you would like to see and not see when making your 3d model
if you lick on the smooth + highlights tab you'll find all the options
 i add Edged faces so that i can keep and eye on what my model looks like without having to guess. this is preferred by many if not all who use the programme.
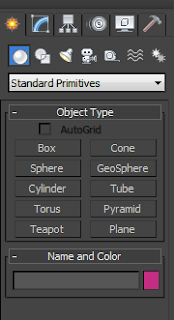
This part of the software is for all you basic starting and modifying of shapes. ( which will later become 3d models)
 THIS IS THE CREATE TAB ( if you hover over it it even says create)
 THIS IS THE MODIFY TAB ( says modify when hovered over)
(modify allows you to play with edges faces and vertices on your selected geometry)

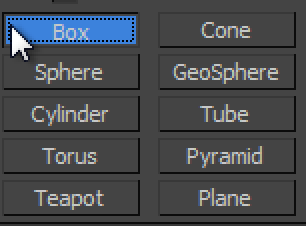
so under the create tab there is a sphere that in this image is highlighted blue.
this is where you can find all your geometry.
I clicked box for purposes of being quick on this topic
Click and drag your mouse inside the view port untill there is a flat square and then pull the face up and away from the ''floor'' to create your geometry! to de-select the box making tool you have to right click. ( right click can also delete a piece of geometry that you accidentally placed and haven't finished creating)
Also to pan around your object in your selected view port click 'alt' and click down on the scrolling wheel of you mouse ''middle mouse button''
so now you just have a box in your screen! if you just right click on the box some options will come up
You want Shortcut key
Move W
Rotate E
Scale R
MOVE
ROTATE
SCALE
THIS IS THE TASK BAR OF WHICH IS AT THE TOP OF THE SCREEN!
here are some of the more important icons and what they do.
icon on the left is select only middle is select by name as if you name your geometry it is easier in the long run and the icon on the right is just a selection and it selects all the faces/verts/edges that it sees
The icon on the left is the move tool, in the middle is the rotate tool and on the right is the scale tool, ( if the scale tool doesnt have these 2 arrows on it may not scale in proportion, if it doesn't scale in proportion click on the icon and drop down to the one that looks like this!.
This is angle snaps and this is particularly useful as you rotate in 0.5 degree sums and not 0.01degree sums. Thus making it quicker and easier to get an accurate 180 degree rotation
this is for rendering you piece to see what it looks like without all its ugly faces. the one on the far left is the material editor but we don't need to worry about that today
the one on the left is the render setup icon and this is for fancying up your renders. the middle on is render frame window and this renders what is currently in the viewport and i dont use too much at the moment but the one on the right is the render production tool and it takes the perspective of either the camera or the view of which you look at the object in the view port. ( also is affected by the render setup)
And that's all really for now!
I really enjoy using 3d studio max and hope that these pictures can guide people into the software and not scare them away from max's crazy interface !
But do not fear as Max is easy to get used to if you use it again and again!
Thanks again. :)


No comments:
Post a Comment